






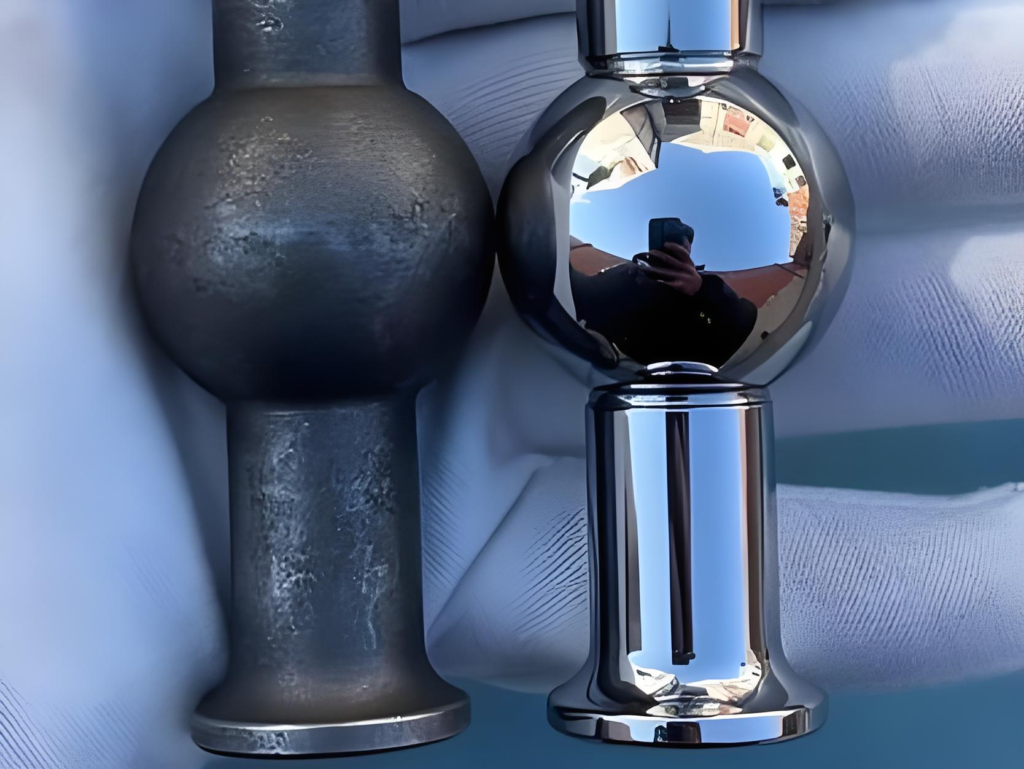
《实现数控加工金属零件光学镜面光洁度的完整指南》


In precision manufacturing, the mirror finish represents the gold standard of surface quality. Far more than just an aesthetic treatment, this ultra-smooth, highly reflective surface delivers measurable functional benefits across aerospace, medical devices, food processing equipment, semiconductor tooling, and high-end consumer products.

Producing a true optical-grade mirror surface requires systematic control over every stage of production—from initial material selection through final CNC programming, multi-stage polishing, and protective post-processing. This guide breaks down the proven methodology that professional machine shops use to consistently deliver flawless reflective surfaces.

Defining True Mirror Surface Quality

A genuine mirror finish is quantified by surface roughness measurements, not visual inspection alone. The industry standard requires:

  • Surface roughness ≤ Ra 0.2 μm (8 microinches) for standard mirror finishes
  • Ra ≤ 0.05 μm (2 microinches) for optical-grade mirror surfaces
  • Zero visible scratches, pits, or tool marks under 10x magnification
  • Light reflectivity exceeding 95% across visible wavelengths

At this level, the surface becomes so smooth that individual photons reflect uniformly rather than scattering, creating the perfect mirror effect. This level of precision cannot be achieved through polishing alone—it requires excellence at every manufacturing step.

Material Selection: The Foundation of a Perfect Polish

Not all metals polish equally well. Your choice of base material determines the maximum achievable finish and the processes required to get there.

Stainless Steel (304/316/17-4 PH)

The most popular choice for mirror finishes due to its excellent corrosion resistance and polishing response. Austenitic grades like 316L produce the brightest finishes and are ideal for medical, food, and marine applications. Martensitic grades can be polished but require more aggressive cutting and intermediate stress relief.

Aluminum Alloys (6061/7075/5052)

Lightweight and relatively easy to polish, aluminum mirrors are widely used in lighting, automotive trim, and optical components. Note that aluminum is softer and more prone to scratching during handling, so anodizing or clear coating is almost always recommended after polishing.

Brass & Copper Alloys

These materials naturally polish to a warm, gold-toned luster that requires no additional coating for decorative applications. Free-machining brass grades produce exceptional results with minimal polishing time, making them cost-effective for hardware and decorative components.

Titanium & Exotic Alloys

Titanium can be polished to excellent mirror finishes but requires specialized abrasives and process control due to its low thermal conductivity and high work-hardening rate. Medical implants and aerospace components frequently specify polished titanium for biocompatibility and fatigue resistance.

CNC Machining: The Critical First Step

Most mirror finish failures originate in the CNC department, not the polishing room. Even the most skilled polisher cannot remove deep tool marks or correct machining-induced surface damage. Optimize your machining parameters specifically for subsequent polishing.

Tooling Strategy

  • Use new, sharp solid carbide end mills specifically designed for finishing operations
  • Implement ball nose end mills for contoured surfaces with step-downs under 0.1mm
  • For flat surfaces, use PCD-tipped face mills for the absolute smoothest initial cut
  • Avoid using tools that have already machined abrasive materials like steel on aluminum or brass parts

Cutting Parameters

  • Increase spindle speed by 20-30% compared to standard finishing operations
  • Reduce feed rates to 50-70% of normal finishing values to minimize tool pressure
  • Keep depth of cut under 0.2mm for final finishing passes
  • Use high-pressure coolant directed precisely at the cutting zone to eliminate built-up edge and thermal damage
  • Minimize step-over distance to 0.05mm or less for ball nose operations

Workholding & Vibration Control

  • Use the most rigid workholding possible to eliminate chatter
  • Balance tool holders properly for high-RPM operations
  • Consider harmonic milling strategies to reduce tool vibration
  • Allow parts to thermally stabilize before taking final finishing cuts

Multi-Stage Polishing Methodology

Polishing is a progressive process—you cannot jump from coarse abrasives directly to a mirror finish. Each stage must completely remove the scratches from the previous grit before moving to the next finer abrasive.

Stage 1: Abrasive Belt Grinding (Grit 80-240)

Begin with coated abrasive belts to remove CNC tool marks and level the surface. Maintain consistent pressure and always polish in one direction during this stage. For complex geometries, use flexible abrasive drums or hand blocks to maintain flatness.

Stage 2: Hard Wheel Polishing (Grit 320-600)

Move to sisal or hard felt wheels with aluminum oxide or silicon carbide compounds. This stage removes the deeper scratches from belt grinding and begins establishing a uniform surface texture. Keep the wheel moving constantly to avoid overheating or creating low spots.

Stage 3: Greaseless Compound Polishing (Grit 800-1500)

Transition to softer cotton wheels with greaseless polishing compounds. These cut faster than traditional grease sticks while producing a finer finish. At the end of this stage, the surface should have a uniform satin appearance with no visible scratches from previous steps.

Stage 4: Buffing for Mirror Finish (Grit 3000+)

The final mirror is achieved using loose muslin or flannel wheels with premium polishing compounds. Start with a medium cut white compound for initial brightening, progress to a fine green rouge for stainless steel and steel, use blue or pink rouge for aluminum and brass, and finish with a clean, dry wheel to remove all compound residue.

Electropolishing for Production Consistency

For high-volume production or complex internal geometries, electropolishing offers distinct advantages. This electrochemical process removes a thin layer (0.001-0.005mm) from the part surface, dissolving microscopic peaks and valleys simultaneously. Electropolished parts have superior corrosion resistance and complete coverage on hard-to-reach areas that mechanical polishing cannot access.

Post-Polishing Protection & Enhancement

A freshly polished metal surface is chemically active and will begin oxidizing immediately upon exposure to air. Proper post-processing preserves the mirror finish and extends service life.

Clear Ceramic Coatings

Modern nano-ceramic clear coats provide excellent UV protection and scratch resistance while enhancing reflectivity. These coatings bond molecularly to the metal surface and can last 5-10 years in outdoor applications without yellowing.

Anodizing for Aluminum

Clear anodizing creates a hard, transparent aluminum oxide layer that protects the polished surface from scratches and oxidation. Type II anodizing at 5-10 microns thickness maintains mirror quality while adding significant durability.

Chrome & Nickel Plating

For the ultimate in reflectivity and durability, electroless nickel plating followed by decorative chrome plating produces a mirror surface that is harder and more corrosion-resistant than the base metal. This is the standard finish for automotive trim and high-end plumbing fixtures.

Passivation for Stainless Steel

After mechanical polishing, stainless steel parts should be passivated in citric or nitric acid to remove free iron particles from the surface and restore the protective chromium oxide layer. This prevents future rust spots and maintains finish integrity.

Quality Control & Common Defects

Even experienced polishers encounter defects. Learn to identify and correct these common issues:

  • Orange peel texture: Caused by over-polishing soft materials or excessive wheel pressure. Correct by going back to a coarser grit and using lighter pressure.
  • Micro-scratches: Almost always from contaminated polishing wheels or compound. Use dedicated wheels for each grit level and filter compounds regularly.
  • Cloudy finish: Results from incomplete removal of previous grit scratches or residual compound. Ensure each stage is complete before progressing, and clean parts thoroughly between stages.
  • Edge rounding: Occurs when polishing pressure is too high on sharp edges. Use masking or edge protectors during final polishing stages.

结论

Achieving a production-grade mirror finish on CNC machined parts is a systematic process that combines precision machining, skilled polishing technique, and proper material science. While the process demands attention to detail and quality control at every step, the results speak for themselves—components that look exceptional while delivering improved corrosion resistance, easier cleaning, reduced friction, and enhanced optical performance.

For critical applications or high-volume production, partnering with an experienced CNC shop that specializes in precision surface finishing eliminates the trial and error and delivers consistent, flawless results on every part.

联系我们

    您所在的行业 *

    上传 2D/3D 图纸

    上传文件,立即获得报价(请附上任何格式的二维 CAD 图纸和三维 CAD 模型,包括 STEP、IGES、DWG、PDF、STL、ZIP 等)。.

    最大文件大小:20MB

    项目详情(请包括:部件名称/数量/材料/颜色/表面处理)